
My System Setup (Arch Linux + Customizations) - 2018
It’s been a while since I wrote a blog post, plus I realized I never documented how I setup my system (and always end up with a system with minor differences). So I decided why not kill two birds with a single stone.
Base system
My daily driver is a Leonov Ideapad 310, (which I will review soon ? ![]() )
)
Base system is always Arch Linux, I also tried Antergos but didn’t like it (Live ISO cannot unblock wireless radios, no option of selecting Indian Locale and some minor bugs). I chose Arch, because for me it’s the right combination of stable and latest. Hardly had any issues with Arch other than the harbuzz issue in 2017 which was due to infinality becoming dead.
Arch wiki is the best place if you want the steps to install Arch Linux. Last time I used the guide by OSTechnix along with Arch Wiki to install the base system. I will omit the details regarding how to install Arch, since it’s not a install tutorial and there are more than enough tutorials that does a good job of listing steps to install Arch.
After installing Arch (and creating a user) next thing I do is to install some common Utility software including Desktop Environment,Text Editors, Shell, Browsers and other daily use tools.
Tools
Here is list of softwares that I install, followed by a detailed installation and customization I do.
tl;dr
Some tools come under both programming and General to me :)
General
-
Essentials - (Keepassx, Yay (AUR Helper), Albert, Transmission, Ufw, Git, Dnsmasq, iptables,Wget axel, Ntfs-3g)
sudo pacman -S keepassx tranmission-gtk ufw git dnsmasq iptables wget axel ntfs-3ginstall yay from AURyay -S albert - DE - (Gnome and Cinnamon ) -
sudo pacman -S gnome gnome-tweak-tool cinnamon gedit - Broswers (Firefox, Chromium and Chrome)
sudo pacman -S firefox chromium chrome - Multimedia (Vlc, Gimp )
sudo pacman -S vlc gimp -
Command Line Enhancements (Zsh, Prezto, Tmux, Vim, Guake)
sudo pacman -S zsh tmux vim guake - Fonts (Ubuntu, Indic, Source Code Pro)
sudo pacman -S ttf-indic-otf ttf-ubuntu-font-family adobe-source-code-pro
Programming
- Android Studio
- QtCreator
sudo pacman -S qtcreator gcc clang - Visual Studio Code
yay -S visual-studio-code-bin - Asdf (Git Install)
- Docker
sudo pacman -S docker
Customizing
AUR Helper
AUR completes Arch. For many years I have been using yaourt but switched to [yay] (https://github.com/Jguer/yay). Installation is simple
Clone
git clone https://aur.archlinux.org/yay.git
Makepkg
  cd yay
  makepkg -si
Use
yay -Syyu # Update everything
Command Line
I keep coming back to commnad line for certain tasks, so why not turbocharge it with ~steroids~.
Zsh
Bash is good as well but over the years I have found myself liking zsh more.
Installing is simple as
sudo pacman -S zsh
Barebone zsh is powerful but one need to customize it and add plugins which takes time, that’s where frameworks like Oh-my-zsh and prezto come into place.
I was using oh-my-zsh in past but use prezto now, in my opinion prezto is fast and light weight in comparison to oh-my-zsh. Pick whatever you like, got no time for flame wars ![]()
Detailed instructions are available at prezto’s Github repo Here are the commands
Prezto
 # Launch zsh if you haven't
 zsh

 # Clone
 git clone --recursive https://github.com/sorin-ionescu/prezto.git "${ZDOTDIR:-$HOME}/.zprezto"

 # Copy config
 setopt EXTENDED_GLOB
 for rcfile in "${ZDOTDIR:-$HOME}"/.zprezto/runcoms/^README.md (.N); do
  ln -s "$rcfile" "${ZDOTDIR:-$HOME}/.${rcfile:t}"
 done

# Change default shell
 chsh -s /bin/zsh
Now let’s configure prezto. Do all the changes in ~/.zpretzorc
I kind of like the default theme sorin
# Set the prompt theme to load.
# Setting it to 'random' loads a random theme.
# Auto set to 'off' on dumb terminals.
zstyle ':prezto:module:prompt' theme 'sorin'
Add useful plugins modules
history-substring-search let’s you search previously issued commands by UP and DOWN arrows.
If you used cat hello.txt earlier then just by typing ca and pressing UP arrow will show previosuly issues command.
syntax-highlighting highlights your command to hint whether the command is valid or not.
# Set the Prezto modules to load (browse modules).
# The order matters.
zstyle ':prezto:load' pmodule \
  'environment' \
  'terminal' \
  'editor' \
  'history' \
  'directory' \
  'spectrum' \
  'utility' \
  'completion' \
  'prompt' \
  'history-substring-search' \
  'syntax-highlighting'


##### History Substring Search Config
# Set the query found color.
 zstyle ':prezto:module:history-substring-search:color' found 'green'

# Set the query not found color.
 zstyle ':prezto:module:history-substring-search:color' not-found 'red'

# Set the search globbing flags.
 zstyle ':prezto:module:history-substring-search' globbing-flags ''
If you want to explore more prezto modules, check out this blog
Tmux
Tmux stands for terminal multiplexer and let’s you many control/manipulate virtual terminl pane from a single terminal. You can minimize,detach and attach to different sessions. Imagine closing a process in terminal and resuming it again in other terminal from where you left it (seems like Magic). Tmux let’s you do that.
Installation is simple
pacman -S tmux
Configuring tmux
I stole copied and mashed Tmux config from here and here
Here is my copied config
###############################################################################
############# Bindings
###############################################################################
# Set the prefix to `ctrl + a` instead of `ctrl + b`
unbind C-b
set-option -g prefix C-a
bind-key C-a send-prefix
# Automatically set window title
set-window-option -g automatic-rename on
set-option -g set-titles on
# Use | and - to split a window vertically and horizontally instead of " and % respoectively
bind | split-window -h -c "#{pane_current_path}"
bind - split-window -v -c "#{pane_current_path}"
unbind '"'
unbind %
# Bind D to resize the window to be 8 lines smaller
bind D resize-pane -D 8
# Use shift + arrow key to move between windows in a session
bind -n S-Left previous-window
bind -n S-Right next-window
# Use r to quickly reload tmux settings
unbind r
bind r \
source-file ~/.tmux.conf \;\
display 'Reloaded tmux config'
# Use m and M to toggle mouse mode on and off respectively
unbind m
unbind M
bind-key m \
set -w mouse on \;\
display 'Mouse mode on'
bind-key M \
set -w mouse off \;\
display 'Mouse mode off'
###############################################################################
############# Date/Time values that can be displayed in the status line
###############################################################################
# $(echo $USER) - shows the current username
# %a --> Day of week (Mon)
# %A --> Day of week Expanded (Monday)
# %b --> Month (Jan)
# %d --> Day (31)
# %Y --> Year (2017)
# %D --> Month/Day/Year (12/31/2017)
# %v --> Day-Month-Year (31-Dec-2017)
# %r --> Hour:Min:Sec AM/PM (12:30:27 PM)
# %T --> 24 Hour:Min:Sec (16:30:27)
# %X --> Hour:Min:Sec (12:30:27)
# %R --> 24 Hour:Min (16:30)
# %H --> 24 Hour (16)
# %l --> Hour (12)
# %M --> Mins (30)
# %S --> Seconds (09)
# %p --> AM/PM (AM)
# For a more complete list view: https://linux.die.net/man/3/strftime
###############################################################################
############# Settings
###############################################################################
# Refresh status line every 5 seconds
set -g status-interval 5
# Start window and pane indices at 1.
set -g base-index 1
set -g pane-base-index 1
# length of tmux status line
set -g status-left-length 30
set -g status-right-length 150
# Make active pane border blue
set -g pane-active-border-fg blue
# Set the background color
set -g status-bg colour8
#colour0 (black)
#colour1 (red)
#colour2 (green)
#colour3 (yellow)
#colour4 (blue)
#colour7 (white)
#colour5 colour6 colour7 colour8 colour9 colour10 colour11 colour12 colour13 colour14 colour15 colour16 colour17
#D ()
#F ()
#H (hostname)
#I (window index)
#P()
#S (session index)
#T (pane title)
#W (currnet task like vim if editing a file in vim or zsh if running zsh)
# customize how windows are displayed in the status line
set -g window-status-current-format "#[fg=colour8]#[bg=colour4]#[fg=colour7]#[bg=colour4] #I* #[fg=colour7] #W #[fg=colour4]#[bg=colour8]"
set -g window-status-format "#[fg=colour244]#[bg=colour8]#I-#[fg=colour240] #W"
Guake
Gnome terminal is okay but it takes a lot of time and there should be a qucik way to get a terminal window beside you, just by a click of button, so you can experiment whatever you were thinking quickly, that’s where Guake comes in, it’s a drop down terminal emulator.
It may not work properly in Wayland, so for best results use Xorg.
Installation is simple pacman -S guake
I some things on every terminal emualtor like changing font to Source Code Pro Regular with 14 width and either Wombat or Solarized Dark colorscheme.
Some Guake specific keyboard shortcuts that I override
Toggle Guake -  F3
Increase Transparency - F7
Decrease Transparency - F6
Vim
I don’t use vim extensively anymore like I used to but whenever I need to edit a file I use vim, for general development I use Visual Studio Code.
Installation is pacman -S vim.
Gnome
I have been using Gnome for 5 years now and I got used to it. Cinnamon is also great. I have only two main issues with Gnome, memory leak and no support for background app icons. Some apps like Albert and Guake doesnt’ work well with Wayland, so I use Gnome with Xorg. With that said, it’s a still good DE to use.
Fonts
I really like the Ubuntu’s font rendering. There was Infinality but now it’s dead. I just set fonts in DE and call it a day.
Fonts I install Ubuntu,Indic Fonts (for Indian Languages), Source Code Pro (for terminal and programming)
sudo pacman -S adobe-source-code-pro ttf-indic-otf ttf-ubuntu-font-family
I use following Font settings
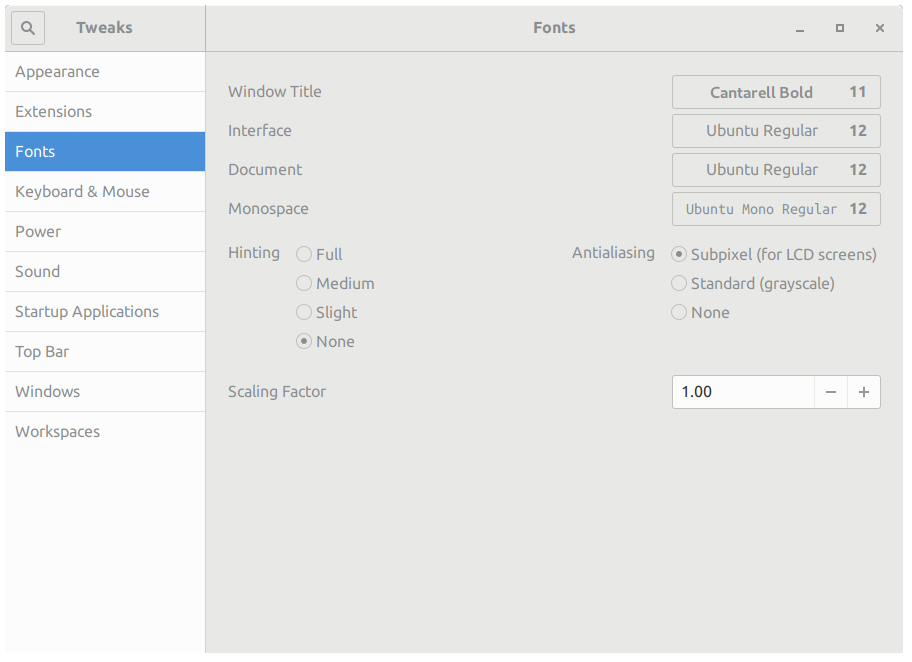
Gnome Configuration
I really hate the fact that gnome-tweak-tool is not part of the Gnome distribution but you need to install it separately, even though it’s a quintessential part for making any change tweak. They have doing some annoying things lately that hurt user experience, like, limiting sound to 100% by default, running on Wayland by default (which breaks some apps), axing tray notifications :sad:.
Also I run Gnome on Xorg and not on Wayland.
Albert
Although not a gnome specific app, Albert makes it easy to open programs, files and do simple calculations, kinda like Spotlight in Mac. Saw this on Kartik Arora’s system during Devfest 2017 and from then started using it.
I set Albert toggle key as F8.
Installation is simple yay -S albert
Nvidia (Bumblebee)
My laptop uses a dual graphics card where intel graphics (usually part of the processor) and high performance Nvidia card is used but by default both GPU’s utilize power and there is no fine grain control that’s where Bumblebee comes into action and let’s you shut off nvidia card when not in use to conserve battery. Install nvidia and nvidia-settings along with bumblebee and intel Xorg driver
sudo pacman -S nvidia nvidia-settings bumblebee mesa xf86-video-intel
Add user to bumblebee group
sudo gpasswd -a $USER bumblebee
Enable Bumblebee Daemon and reboot
 sudo systemctl enable bumblebeed.service
 reboot
Install bbswitch to switch Nvidia GPU and conserve power
sudo pacman -S bbswitch
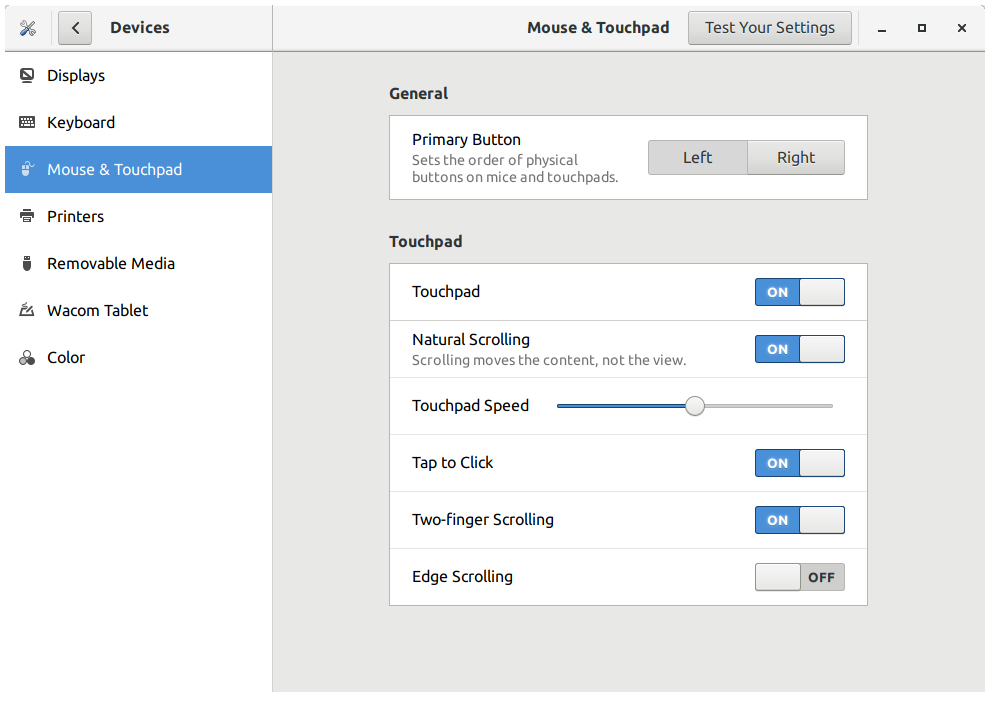
Touchpad
Enable Tap to Click
Gnome Extensions
It’s such a shame that many people need to install so many extensions just to get the desired desktop they want :sad:
First install Gnome Shell Integration for Chrome if you are using Chrom(e)ium, which lets you manage your extensions from the browser.
yay -S chrome-gnome-shell-git
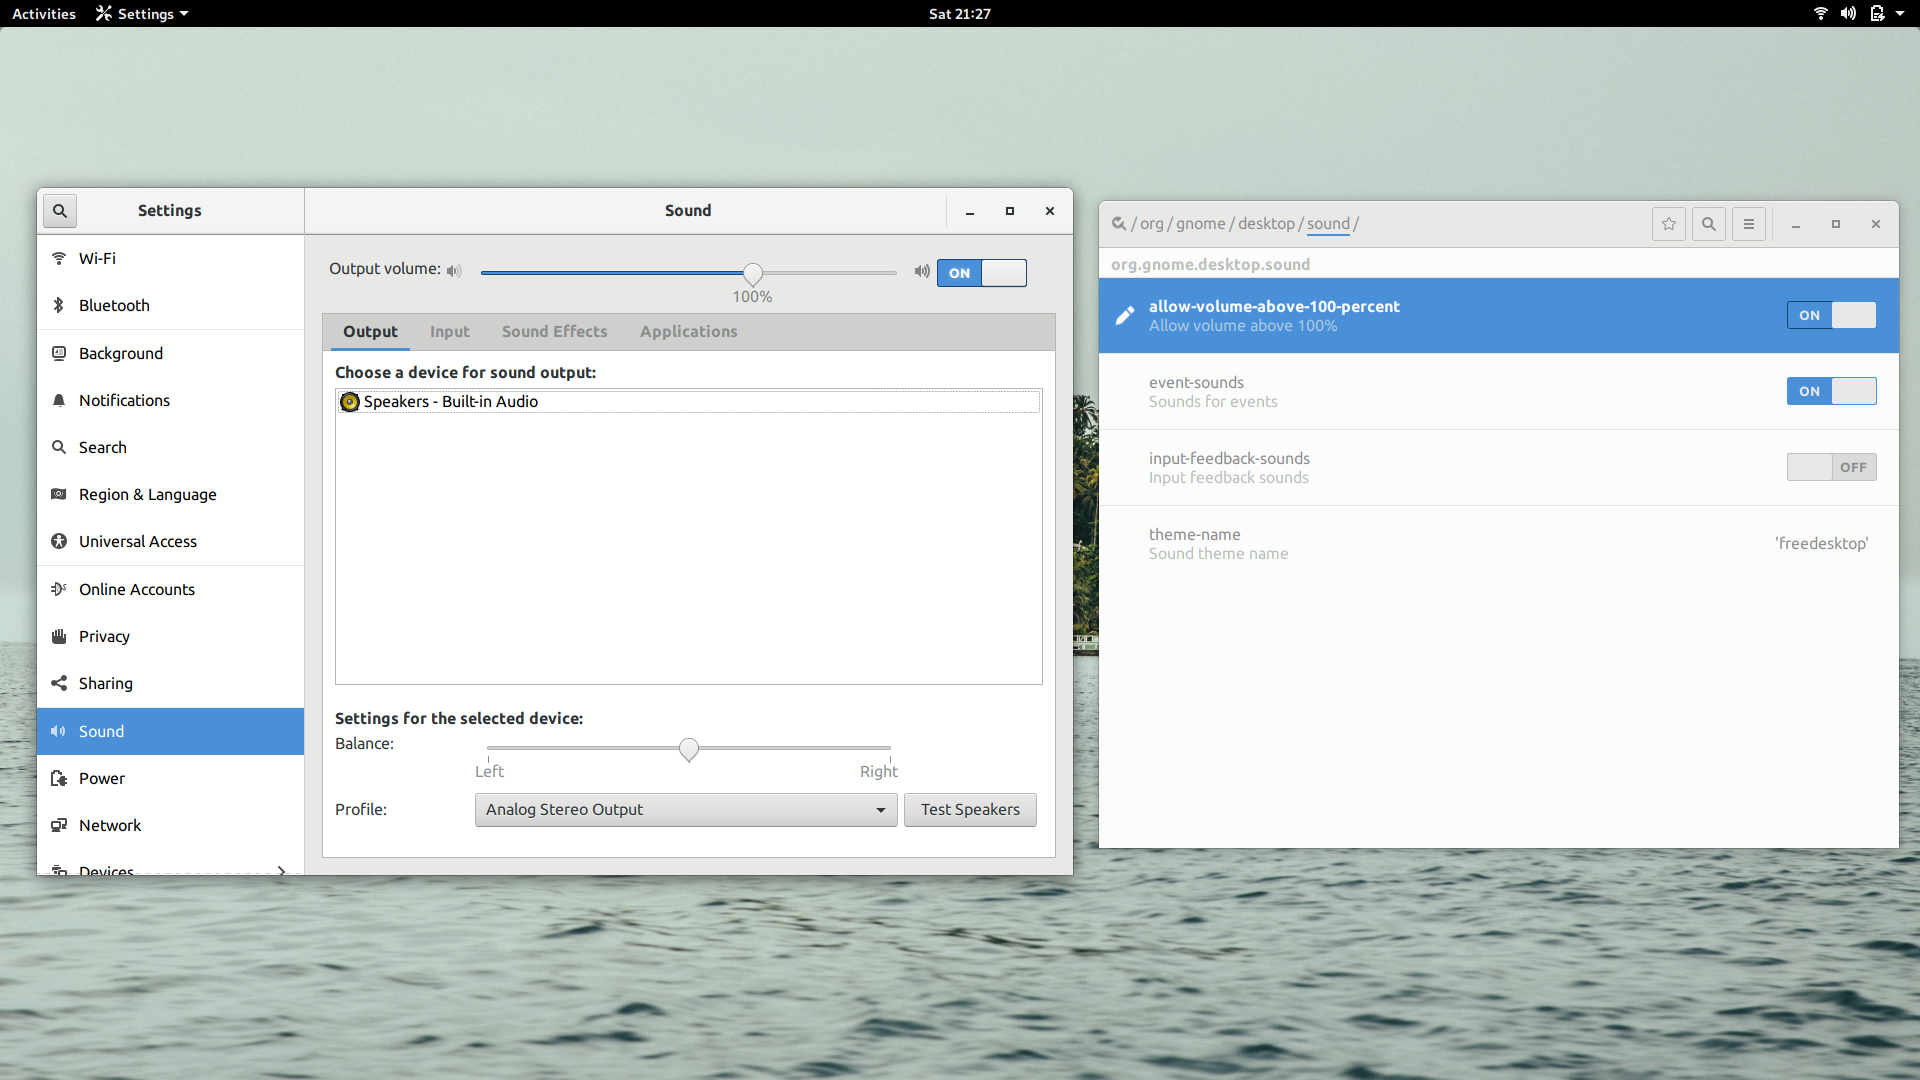
Sound
Gnome by default limits sound to 100%, we need to override it. Dconf-editor easily let’s you do that.
Install dconf-editor sudo pacman -S dconf-editor, search for sound and enable allow-volume-above-100-percent flag.
Programming
I usually do a mix of Web development,Android Development, some competitive programming (trying to become better), ocassional pentesting or just explore new horizons. So there are some tools that I install only sometimes and some that are default for me, but here are the tools that I am currently using
Asdf
Before Asdf I was using rbenv but asdf provides plugins for many languages, it’s like having one tool to install them all. Installation
git clone https://github.com/asdf-vm/asdf.git ~/.asdf --branch v0.4.3

# Source asdf
echo -e '\n. $HOME/.asdf/asdf.sh' >> ~/.zshrc
echo -e '\n. $HOME/.asdf/completions/asdf.bash' >> ~/.zshrc
Configuration
Ruby
Install ruby asdf plugin-add ruby
Install Ruby (in this case 2.4.0)
asdf install ruby 2.4.0
VirtualBox
For running Virtual Machines or just trying out stuff.
pacman -S virtualhost
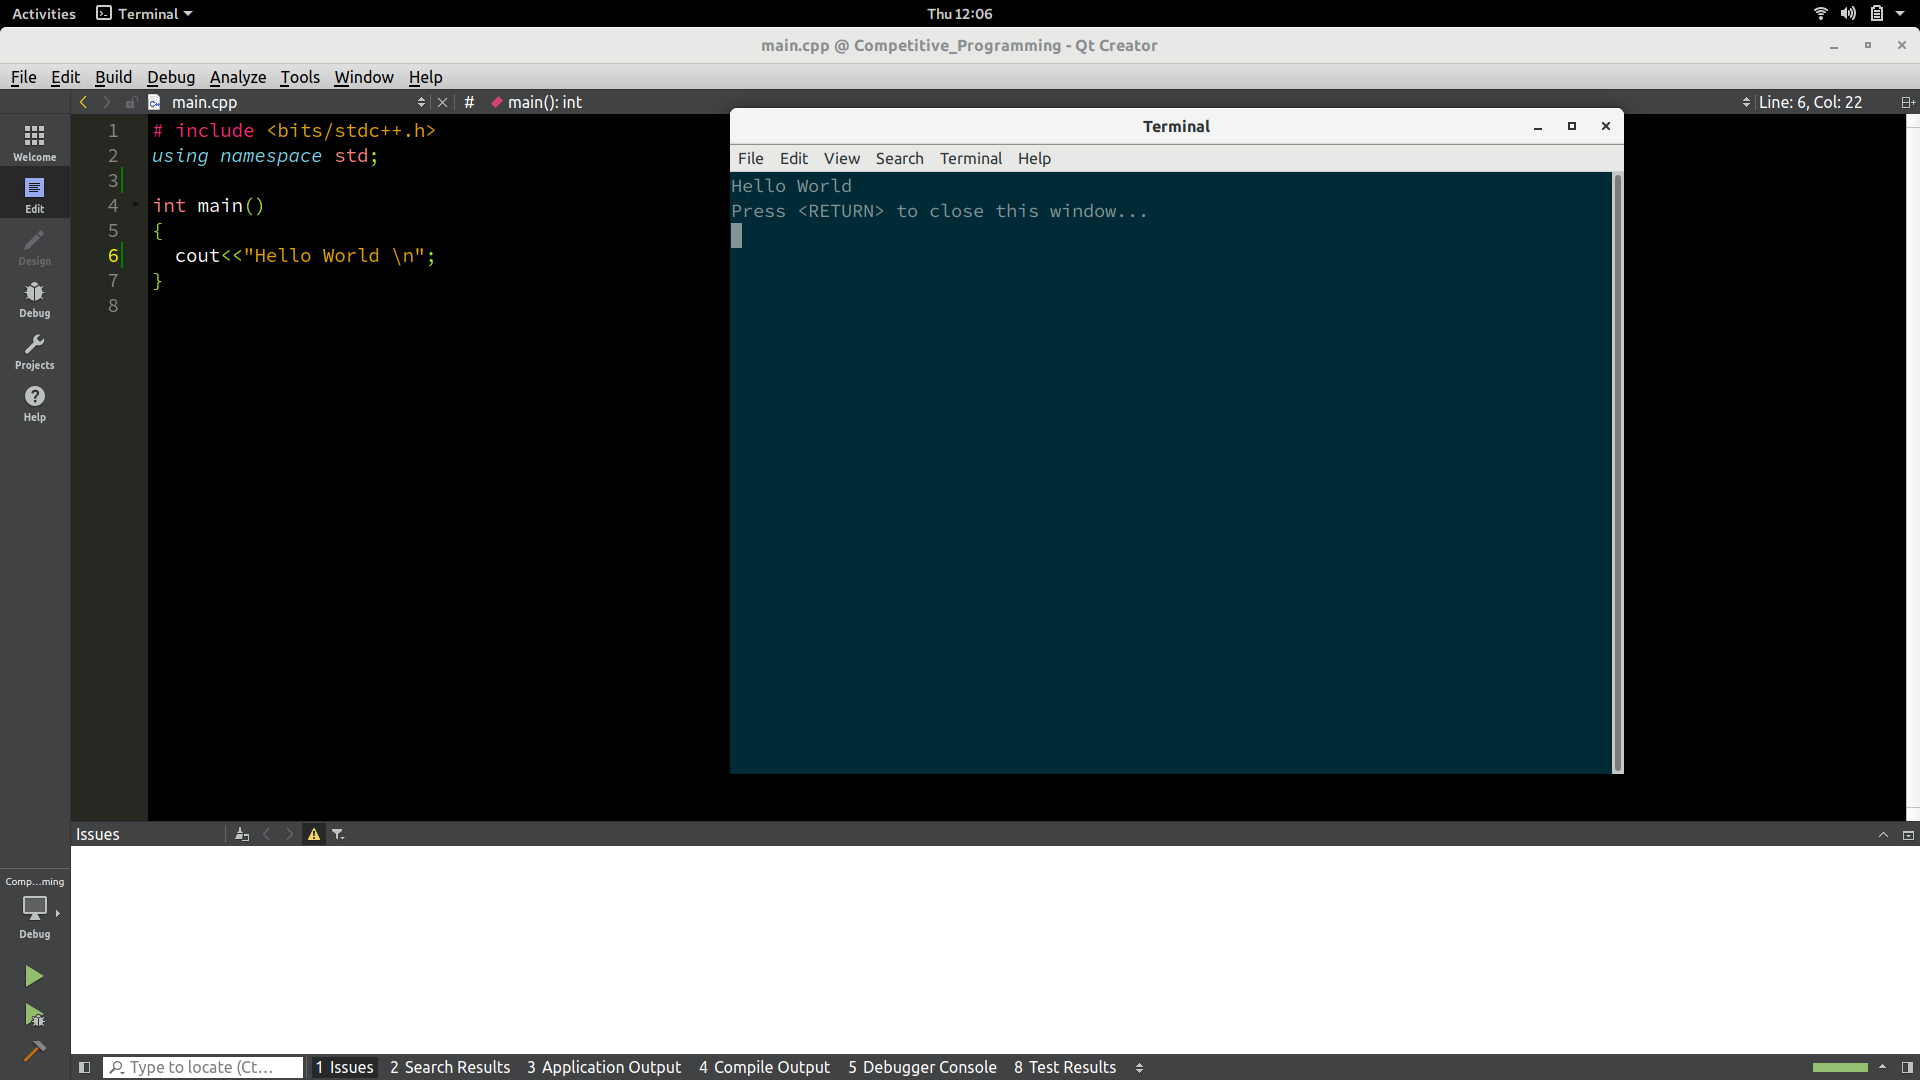
Qt Creator
For C++ I was using Codeblocks but it had issues with Arch due to wx toolkit, then I tried CLion and CodeLite but QtCreator is my default choice, since it’s lightweight and honestly I like working with QtCreator. I use it for Competitive programming practice, though getting used to CMake build system was little dificult compared to Codeblocks compile and run any file.
sudo pacman -S qtcreator
Again with terminals and editor, set a Dark Color Scheme and font to Source Code Pro.
Android Studio
For Android Studio we first need Java RunTime and JDK. There is also an AUR package but I like the simple user only install approach.
Install Essentials JDK and JRE 10 plus android-tools to run adb directly.
sudo pacman -S jre10-openjdk-headless jre10-openjdk jdk10-openjdk openjdk10-doc openjdk10-src android-tools
Qemu and Libvirt for Emualtor
sudo pacman -S qemu libvirt
Install Android Studio itself
mkdir ~/Devel # Where Android Studio will be installed
cd ~/Devel
axel -a https://dl.google.com/dl/android/studio/ide-zips/3.1.1.0/android-studio-ide-173.4697961-linux.zip # Use axel to speed download, replace by latest version link
unzip android-studio-ide-173.4697961-linux.zip # Extract
cd android-studio/bin
chmod +x studio.sh
./studio.sh
Comments